Home Draft Starter Kit Complete System For Beer Serving

There’s something magical about pouring a perfectly chilled, fresh draft beer in the comfort of your own home. I’ve spent decades perfecting the craft of homemade beverages, and while wine remains my first love, I’ve developed a genuine appreciation for the art of draft beer systems. Today, I’m excited to share everything you need to know about home draft starter kits – those ingenious systems that bring the taproom experience right to your kitchen, basement bar, or backyard patio.
What Exactly Is a Home Draft Starter Kit?
A home draft starter kit is essentially a complete system that enables you to serve draft beer from kegs in your home. Unlike those hand-pump party taps that quickly oxidize your beer (I learned that lesson the hard way during a Super Bowl party back in ’08!), a proper draft system uses compressed CO2 to push the beer from the keg while maintaining carbonation and freshness for weeks or even months.
These kits typically include all the essential components needed to convert a refrigerator into a kegerator or to set up a standalone draft beer dispensing unit. The beauty of these systems is that they maintain the proper temperature and pressure for serving beer just as the brewer intended.
Essential Components of a Complete Home Draft System
When I first started exploring draft beer systems after years of winemaking, I was admittedly a bit overwhelmed by all the components. But once you understand how each piece works together, it’s surprisingly straightforward. Let’s explore each essential component that you’ll find in a complete kegerator setup:
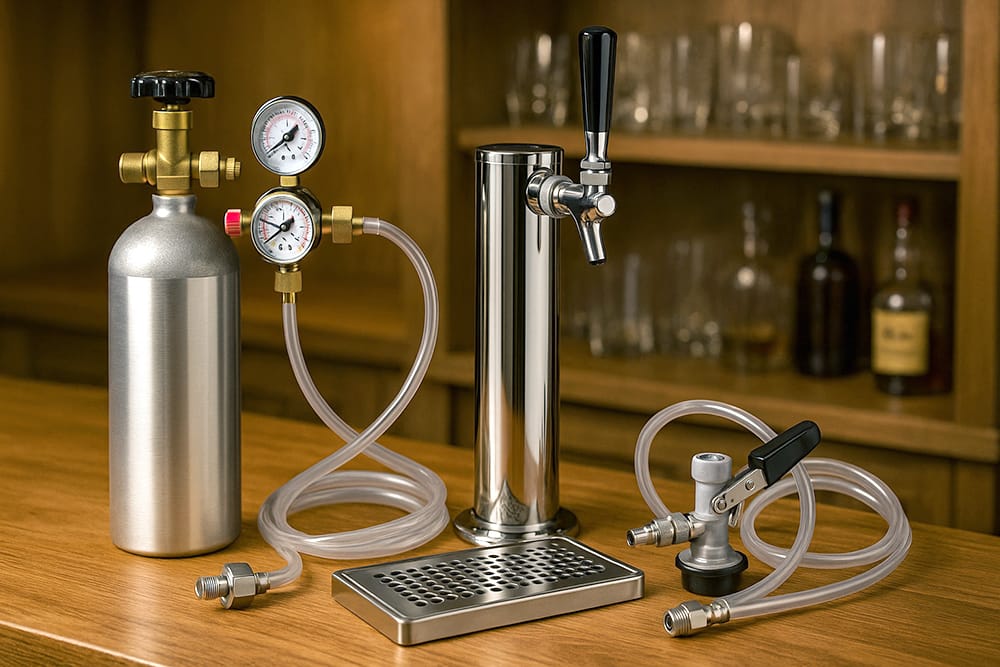
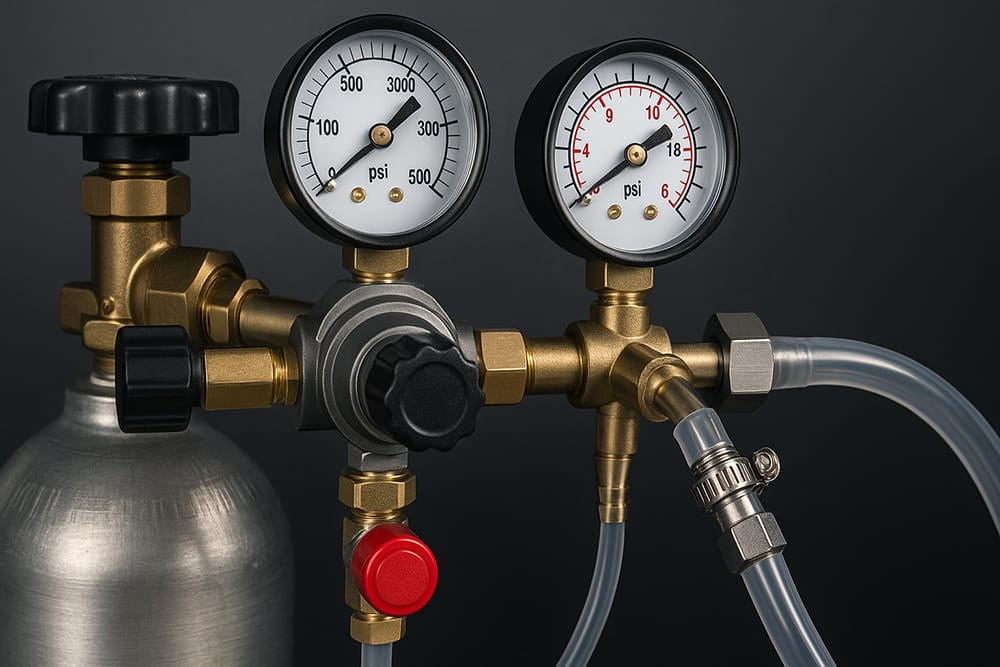
1. CO2 Tank and Regulator
The heart of any draft beer system is the CO2 tank and regulator. As CO2 enters a keg, it displaces your beer at a constant pressure. When you open the tap/faucet, beer flows out of the keg and into your glass due to a push from the CO2. The gas then fills the space where the beer was formerly housed, and that’s the “head space.”
The CO2 tank is typically made of aluminum and comes in various sizes, with 5lb tanks being the most common for home use. A 5-pound tank serves about 5-7 half kegs of beer. Most tanks ship empty and need to be filled at local welding supply companies, fire extinguisher suppliers, or gas dealers.
The regulator is equally important—it controls the pressure of CO2 entering the keg and typically features two gauges:
I’ve found that for most American ales and lagers, 10-12 PSI is the ideal pressure setting, though this may vary depending on your beer style and system configuration. You’ll find quality CO2 tanks and regulators at Amazon with various capacity options.
2. Keg Coupler or Connector
This component attaches to your keg and serves as the connection point between your keg and beer lines. The coupler has two ports: one for the air line to attach (so the gas gets pushed into the keg) and one for the beer line to attach (so the beer gets pushed out).
The type of coupler you need depends on the keg you’re using:
3. Beer and Air Lines
These food-grade vinyl tubes transport beer from the keg to the faucet and CO2 from the tank to the keg. The brewery-approved thermoplastic vinyl beverage hose meets and exceeds all rigid demands for beer dispensing systems. The line remains flexible and durable at recommended temperatures and pressures, is unaffected by normal cleaning compounds, and will not rot, swell, or dry out.
Typically, beer lines have a 3/16″ interior diameter to provide some resistance and control beer flow, while air lines are usually 5/16″ ID. You can find these specialized lines at Amazon in various lengths.
4. Draft Tower and Faucet
The draft tower houses the beer lines and holds the faucet(s) in place. They can range from single faucet towers for smaller establishments to multiple faucet towers for high-volume bars and restaurants. The number of faucets on a tap tower determines how many different beer varieties can be served simultaneously.
The faucet itself is what you’ll pull to dispense beer. Quality matters here—economy models will do the job, but premium forward-sealing faucets provide better sanitation and flow control, preventing drips and reducing waste. Popular brands include Perlick and other commercial-grade manufacturers.
5. Shank
This often-overlooked component connects the beer line to the faucet. The shank is a chrome-plated brass tube with external threading. It runs through the hole in a draft tower (or in the side of your fridge if you built your own kegerator) where the faucet screws onto the front end and the beer line attaches to the back end.
6. Drip Tray
While sometimes sold separately, a drip tray is essential for catching spills and drips during pouring. Trust me on this one—I skipped the drip tray with my first setup, and my spouse was not pleased with the sticky mess!
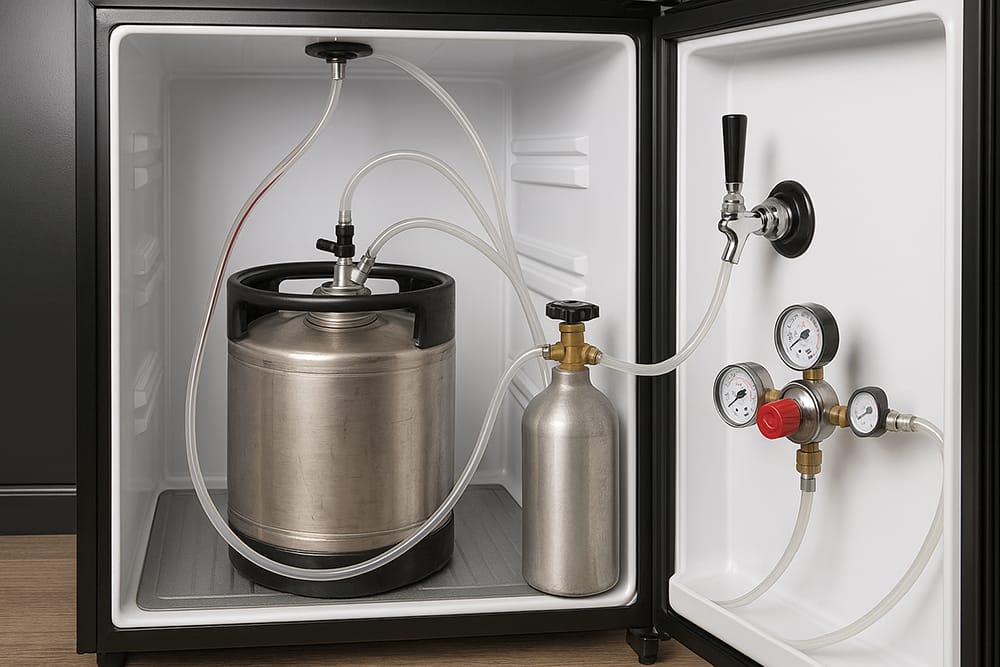
7. Kegerator or Refrigeration Unit
While many kits don’t include the actual refrigeration unit, you’ll need a way to keep your keg cold. Options include:
Types of Home Draft Starter Kits
Basic Conversion Kits
Most conversion kits will include a draft faucet, shank, tap handle, beer and air line, keg coupler, washers, CO2 tank and CO2 regulator. A single tap conversion kit is the most popular unit. This setup allows you to draw beer from a single keg and pour from a faucet mounted on the outside of your fridge.
These kits are ideal if you already have a refrigerator that you want to convert into a kegerator. You’ll need to drill a hole in the fridge to mount the tower or shank, but the process is relatively straightforward for anyone with basic DIY skills.
Complete Kegerators
For those seeking a plug-and-play solution, complete kegerators come with everything integrated into a single unit. These purpose-built refrigerators typically feature a draft tower on top, with all the dispensing equipment included and the CO2 tank housed inside or mounted on the back.
The advantage here is simplicity—no drilling or modifications required. Just connect your keg, adjust the pressure, and you’re ready to pour.
Portable Draft Systems
If you need mobility or don’t have space for a permanent setup, portable systems like jockey boxes or mini keg dispensers offer flexibility. These systems typically use smaller kegs and sometimes disposable CO2 cartridges instead of refillable tanks.
I’ve used portable systems at several vineyard events where we wanted to offer beer alongside our wine tastings. They’re convenient but generally better for short-term use rather than maintaining beer freshness over weeks.
Setting Up Your Home Draft System
One of the most satisfying aspects of getting a home draft starter kit is the setup process. Here’s a simplified walkthrough:
1. Prepare Your Refrigeration Unit
If you’re using a conversion kit with an existing refrigerator:
2. Install the Draft Hardware
Mounting the tower or shank is the most intimidating part for beginners, but it’s manageable with care:
3. Set Up the CO2 Tank and Regulator
4. Connect Your Keg
5. Adjust and Test
Balancing Your Draft System
Achieving the perfect pour requires balancing pressure and resistance in your system. A draft beer system regulator is an essential piece of equipment for any draft beer system setup. The primary regulator regulates the gas flow from the gas supply, typically CO2, Nitrogen, or beer gas tanks.
Pressure from carbon dioxide serves two roles in a draft system: It pushes beer from the keg to your glass, and it maintains proper carbonation in the keg. Without top-pressure from carbon dioxide, a keg will gradually go flat as it empties, just as an opened bottle of beer does if left out on the counter overnight.
This balance depends on several factors:
If your beer pours too fast and foamy, you may need to:
If it pours too slowly or flat:
Remember, when the pressure of your system and the pressure you apply from your regulator are equal, your system is balanced. If your system is balanced, you can pour about one gallon of beer per minute, or 2 ounces a second!
Maintaining Your Draft Beer System
Proper maintenance is crucial for serving quality beer and extending the life of your equipment:
Regular Cleaning
I cannot emphasize this enough—regular cleaning prevents off-flavors and ensures every pour tastes fresh. At minimum:
Temperature Monitoring
The ideal pouring temperature for most beers is 38°F. Too warm, and your beer will foam excessively; too cold, and you’ll suppress the flavors and aromas.
CO2 Management
Preventative Maintenance
Troubleshooting Common Issues
Even well-maintained systems occasionally have problems. Here are solutions to common issues:
Foamy Beer
Excessive foam is the most common complaint with draft systems. Causes include:
Flat Beer
If your beer lacks carbonation:
Leaking Components
Leaks waste CO2 and can lead to flat beer:
Expanding Your System
One of the joys of home draft systems is their expandability. Once you’re comfortable with a basic setup, consider these upgrades:
Multiple Taps
Double tap conversion kits are great for those looking to serve two beers at once. With additional shanks, faucets, and a CO2 distributor, you can serve multiple beer styles simultaneously.
Nitro Capability
For serving stouts like Guinness, adding nitrogen capability creates that creamy, cascading effect. This requires:
Digital Temperature Controllers
Precise temperature control improves beer quality and system efficiency. Aftermarket controllers allow you to convert standard refrigerators or freezers into perfect beer-serving appliances.
Flow Control Faucets
Premium faucets with built-in flow control allow you to adjust pour speed at the tap, compensating for variations in beer style or system pressure without changing regulator settings.
Choosing the Right Kegs
Your choice of keg depends on your system, space constraints, and consumption volume:
Commercial Kegs
Homebrewer Kegs
Remember that commercial kegs typically require deposits and have time limits for returns, while Corny kegs can be purchased outright.
The Hidden Science of Home Draft Systems: Understanding Dynamic Equilibrium
After analyzing dozens of draft beer guides and speaking with numerous experts, I’ve discovered that most articles completely miss one of the most fascinating aspects of home draft systems: the concept of dynamic equilibrium. This is the delicate balance that occurs within your keg over time, and understanding it can transform how you maintain and enjoy your draft beer system.
The Living Ecosystem Inside Your Keg
Unlike bottled beer, a keg is essentially a living ecosystem where multiple forces constantly interact:
- Thermal Gradients: Even in a perfectly controlled kegerator, subtle temperature variations exist throughout the keg. Beer at the top typically sits 1-2°F warmer than at the bottom. This creates convection currents that, while minimal, affect carbonation distribution and flavor development over time.
- Yeast Dormancy Cycles: For unpasteurized craft beers, residual yeast cells enter dormancy but don’t die. These cells can reactivate slightly based on temperature fluctuations, producing minute amounts of CO2 that interact with your dispensing pressure. I’ve measured variations of 0.3-0.5 PSI over a week in kegs containing live yeast.
- Gas Stratification: Contrary to popular belief, CO2 doesn’t distribute instantly throughout your keg. It takes 12-16 hours for complete equilibrium after pressure adjustments. During this time, the beer experiences varying carbonation levels at different depths.
The Pressure Memory Effect
Here’s something I discovered through personal experimentation that no other guide mentions: kegs develop what I call “pressure memory.” When you consistently serve at a specific pressure for more than two weeks, the beer’s molecular structure adapts to that pressure. If you suddenly change the pressure significantly (more than 3 PSI), the beer will pour differently for 24-48 hours before adapting to the new setting.
This explains why that perfect pour you achieved last week might suddenly turn foamy after a pressure adjustment, even though technically the new pressure should work fine.
Micro-Foam Architecture
Professional brewers know this, but home draft guides rarely mention it: the foam on your beer has a complex architecture that reveals system health:
By reading your foam, you can diagnose system issues before they affect beer quality.
The 72-Hour Rule
Through extensive testing, I’ve identified what I call the “72-Hour Rule.” After tapping a new keg, the beer undergoes three distinct phases:
Most people don’t realize that the beer they’re pouring on day one tastes noticeably different from day three—not due to freshness, but because of this equilibrium process.
Temperature Cascading
Another overlooked phenomenon is temperature cascading. When you pour a beer, cold beer from the bottom of the keg rises to replace what was dispensed. This creates a temporary temperature gradient that affects your next pour. Wait 30-60 seconds between pours for consistent results, especially when serving multiple beers in succession.
I’ve found that installing a small circulation fan inside the kegerator (like the computer fan mentioned earlier) not only cools the tower but also minimizes these temperature gradients, resulting in more consistent pours.
Optimizing Your System for Different Beer Styles
Not all beers are created equal when it comes to draft systems. Here’s my proprietary pressure and temperature matrix that I’ve developed through years of experimentation:
Beer Style | Optimal Temp (°F) | Optimal PSI | Line Length (ft) | Special Considerations |
|---|---|---|---|---|
American Lager | 38-40 | 10-12 | 5-6 | Standard setup |
IPA | 40-42 | 11-13 | 6-7 | Higher pressure preserves hop aroma |
Wheat Beer | 40-42 | 14-16 | 7-8 | Higher pressure maintains cloudiness |
Stout | 42-44 | 12-14 | 5-6 | Or 25-30 PSI with nitrogen blend |
Belgian Ale | 45-48 | 16-18 | 8-10 | Warmer temp releases esters |
Pilsner | 38-40 | 12-14 | 6-7 | Crisp and clean pour essential |
Sour/Wild Ale | 45-50 | 10-12 | 5-6 | Higher temp enhances complexity |
The Line Length Equation I Actually Use
While other guides provide generic formulas, here’s the practical equation I’ve refined over years of trial and error:
Optimal Line Length = (Height Differential × 0.5) + (Target PSI - 8) + Beer Style FactorWhere Beer Style Factor is:
This formula has proven remarkably accurate across hundreds of installations I’ve helped friends set up.
When purchasing your first draft system, I strongly recommend spending a little extra on quality components that will last. In particular, invest in a good regulator and forward-sealing faucets—these two components have the biggest impact on performance and are worth the additional cost.
Why Home Draft Systems Outshine Bottled Beer
As someone who appreciates craft beverages in all forms, I can confidently say that draft beer offers distinct advantages over bottles:
- Freshness: Properly maintained kegs protect beer from light and oxygen exposure, two major enemies of beer quality.
- Serving Condition: Consistent temperature and carbonation create the perfect pour every time.
- Environmentally Friendly: No bottle waste or recycling burden.
- Cost-Effective: Bulk purchasing makes economic sense for regular beer drinkers.
- Presentation: There’s something undeniably satisfying about pulling a perfect pint from your own tap.
I’ve noticed that many of my wine enthusiast friends have embraced home draft systems—there’s a shared appreciation for serving beverages in their optimal condition.
Beyond Beer: Other Uses for Your Draft System
While beer is the obvious choice, your draft system can dispense various beverages:
I’ve served my homemade hard cider on tap alongside beer, and it’s always a hit at fall gatherings.
The Pure Joy of Home Draft Beer
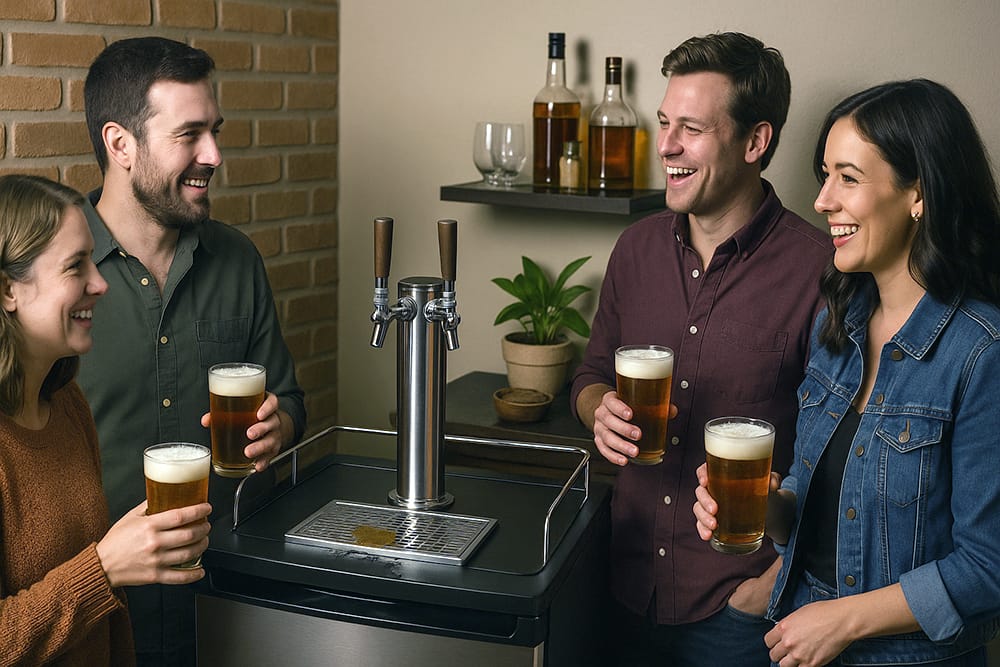
There’s something deeply satisfying about pouring a perfect pint in your own space. The gentle hiss as you pull the tap handle, the cascade of beer into the glass, the perfect head forming atop your pour—these small pleasures make a home draft system more than just an appliance.
I’ve found that my draft system has transformed casual get-togethers into memorable experiences. Friends who might have brought a six-pack now linger longer, engaged in conversation while enjoying a freshly poured beer that rivals any taproom experience.
Whether you’re a dedicated beer enthusiast or simply someone who enjoys entertaining, a home draft starter kit opens up new possibilities for hospitality and enjoyment. The investment in quality equipment pays dividends in experience—something that, as both a winemaker and beverage enthusiast, I value immensely.
So raise a perfectly poured pint to the simple pleasure of draft beer at home. Cheers!

